The DIY Thread

Bands, chains, wraps, straps, racks... are you sure this is training related?

Moderators: mgil, Cody

Post Reply
User avatar
Griff
Registered User
Posts: 294
Joined: Tue Apr 24, 2018 8:02 am
Location: Tx
Age: 41

Re: The DIY Thread

#81

Post by Griff » Mon Feb 11, 2019 9:44 am

I did a recent project I thought I'd share--built in barbell storage. Previously I'd just kept my barbell in the top j-cups of my rack (see below). That worked fine for the past couple years. However, I recently got a second barbell and realized I needed a better solution. My main concern was safety--my kids are at ages (4.5 and 3) where they can reach a barbell in the lower j-cups. I could envision them trying to pick one end up and dropping it on their heads. It was also inconvenient having to prop one barbell against a wall whenever I was working.

I looked at other solutions, like a gun rack, or other commercially available hangers or vertical storage options, but I have very limited floor space. I have exposed studs in my garage, so I realized if I could build something within the studs I could store the barbells safely without sacrificing any space.

The "before" setup:

Image

The setup is pretty self explanatory. I used a 2.25" hole saw to cut out the holes in a scrap 2x4. Then used a hand saw and miter box to cut the top holes into a "U" shape. I attached them to the bottom/side studs with 2" wood screws. Then added 6" hasps up top, secured with mini-carabiners (I could use locks, but I'm too lazy to deal with locking and unlocking). The bottom holes are cushioned with stall mat (also cut with the hole saw), and I superglued little scraps of stall mat on the inside of the hasps to create a bumper. I'm happy with the end result. My bars are secured and totally out of the way when not in use.

After:
Image

Image

Image

User avatar
Skander
Registered User
Posts: 1419
Joined: Sun Mar 04, 2018 4:02 pm

Re: The DIY Thread

#82

Post by Skander » Mon Feb 11, 2019 1:34 pm

Griff wrote: Mon Feb 11, 2019 9:44 am I did a recent project I thought I'd share--built in barbell storage. Previously I'd just kept my barbell in the top j-cups of my rack (see below). That worked fine for the past couple years. However, I recently got a second barbell and realized I needed a better solution. My main concern was safety--my kids are at ages (4.5 and 3) where they can reach a barbell in the lower j-cups. I could envision them trying to pick one end up and dropping it on their heads. It was also inconvenient having to prop one barbell against a wall whenever I was working.

I looked at other solutions, like a gun rack, or other commercially available hangers or vertical storage options, but I have very limited floor space. I have exposed studs in my garage, so I realized if I could build something within the studs I could store the barbells safely without sacrificing any space.

The "before" setup:

Image

The setup is pretty self explanatory. I used a 2.25" hole saw to cut out the holes in a scrap 2x4. Then used a hand saw and miter box to cut the top holes into a "U" shape. I attached them to the bottom/side studs with 2" wood screws. Then added 6" hasps up top, secured with mini-carabiners (I could use locks, but I'm too lazy to deal with locking and unlocking). The bottom holes are cushioned with stall mat (also cut with the hole saw), and I superglued little scraps of stall mat on the inside of the hasps to create a bumper. I'm happy with the end result. My bars are secured and totally out of the way when not in use.

After:
Image

Image

Image
That's really clever and clean! I might steal that some day.

User avatar
Griff
Registered User
Posts: 294
Joined: Tue Apr 24, 2018 8:02 am
Location: Tx
Age: 41

Re: The DIY Thread

#83

Post by Griff » Mon Feb 11, 2019 1:50 pm

Skander wrote: Mon Feb 11, 2019 1:34 pm That's really clever and clean! I might steal that some day.
Thanks! I only spent around 2 weeks planning/obsessing over the details :lol:

Ragholmes
Registered User
Posts: 402
Joined: Fri Jun 22, 2018 2:20 pm

Re: The DIY Thread

#84

Post by Ragholmes » Mon Feb 11, 2019 2:02 pm

Griff wrote: Mon Feb 11, 2019 9:44 am I did a recent project I thought I'd share--
+1 for coming up with and making a cool storage solution.
-1 for lack of forethought and planning. I mean I can see room for another hole in the middle at the bottom for your next bar but that top section is gonna need a complete redesign. And what about your new SSB, and your new hex bar, and your new ez-curl bar, and the dumbells, and...

User avatar
Griff
Registered User
Posts: 294
Joined: Tue Apr 24, 2018 8:02 am
Location: Tx
Age: 41

Re: The DIY Thread

#85

Post by Griff » Mon Feb 11, 2019 2:26 pm

Ragholmes wrote: Mon Feb 11, 2019 2:02 pm
Griff wrote: Mon Feb 11, 2019 9:44 am I did a recent project I thought I'd share--
+1 for coming up with and making a cool storage solution.
-1 for lack of forethought and planning. I mean I can see room for another hole in the middle at the bottom for your next bar but that top section is gonna need a complete redesign. And what about your new SSB, and your new hex bar, and your new ez-curl bar, and the dumbells, and...
Ha! I actually planned to do three slots initially, but didn't like any of the options for securing the top of the bars--couldn't find hasps long enough to span the 2"+ needed for the barbell sleeve, but short enough to fit 3 across and wasn't prepared to try to fashion my own hasps. Could have secured the bars across the shaft... but that wouldn't work with any specialty bars, and can't see buying another straight bar. See my reply to Skander about obsessing over this for a while. Ultimately decided to make something to address my current needs (2 straight bars) and address future needs as they arise (e.g. my SSB will would hang from the ceiling on hooks ;) )

User avatar
broseph
High Fiber
Posts: 4990
Joined: Sun Sep 17, 2017 6:11 am
Location: West Michigan
Age: 41

Re: The DIY Thread

#86

Post by broseph » Mon Feb 11, 2019 2:33 pm

Griff wrote: Mon Feb 11, 2019 1:50 pm
Skander wrote: Mon Feb 11, 2019 1:34 pm That's really clever and clean! I might steal that some day.
Thanks! I only spent around 2 weeks planning/obsessing over the details :lol:
I’m glad I’m not the only one who does that with every single simple project.

User avatar
TimK
Much Mustache
Posts: 2979
Joined: Sun Sep 17, 2017 7:03 am
Location: Grand Rapids, MI
Age: 39

Re: The DIY Thread

#87

Post by TimK » Mon Feb 11, 2019 3:46 pm

broseph wrote: Mon Feb 11, 2019 2:33 pm
Griff wrote: Mon Feb 11, 2019 1:50 pm
Skander wrote: Mon Feb 11, 2019 1:34 pm That's really clever and clean! I might steal that some day.
Thanks! I only spent around 2 weeks planning/obsessing over the details :lol:
I’m glad I’m not the only one who does that with every single simple project.
Also guilty

Ragholmes
Registered User
Posts: 402
Joined: Fri Jun 22, 2018 2:20 pm

Lever Belt Squat

#88

Post by Ragholmes » Sun Mar 03, 2019 5:20 pm

The Sorinex jsquat attachment is $499 and attaches to their jammer arms which cost $599.
Just a single landmine from Rogue is $95.
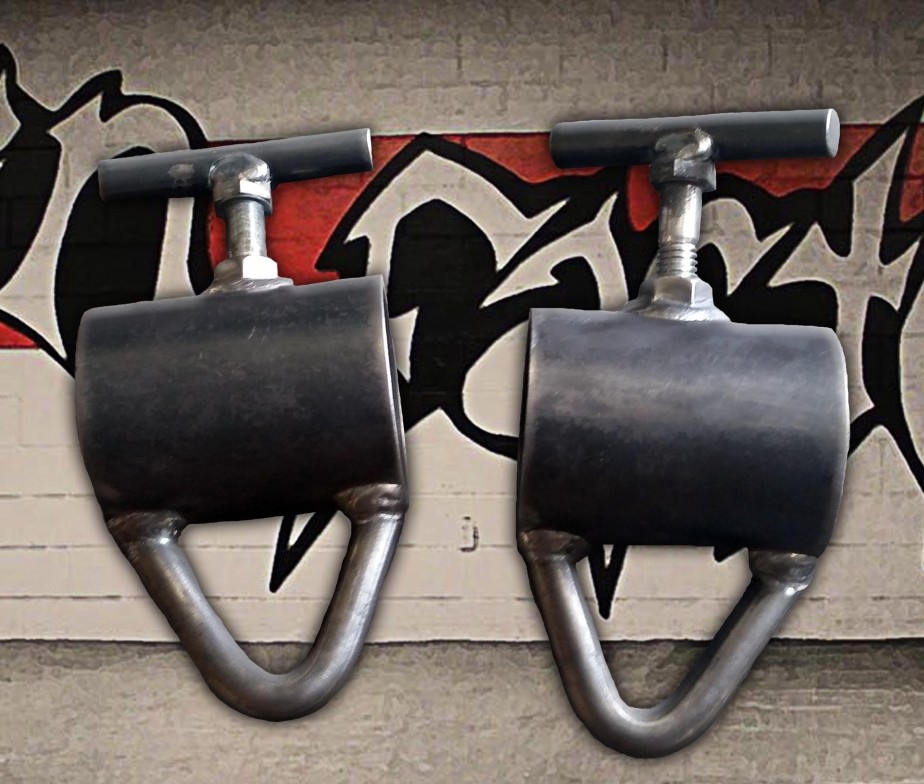
I just made this for $73


I really wanted one, and looking at the jsquat I couldn't see the justification for the price. So started looking into the possibility of making one. I then found that @Testiclaw had made one already. His is here viewtopic.php?p=120624#p120624
Using the jsquat and what Testiclaw made as guides I decided to see how cheap I could do it.
I got 72 inches of 2 inch x 2 inch 11 gauge tube steel for $33.


That extra hole is going to be the swivel point for the kickstand

4 Titan plate holders were $46, I had $20 of Titan points, and then sold 2 of them to @damufunman for $13, so they cost me $13.
* Note the bolts that came with it are long enough for 1 plate holder through 2x2 tube, but were not long enough to go through the tube and 2 plate holders.


I don't have much room in front of my rack. So I bought a landmine to use the swivel so I could attach it to the center upright and angle it out so it wouldn't rub on the front upright. I also discovered neoprene washers in my hardware store wanderings, so the swivel won't scratch up my rack.
Landmine was $33, I had some cc reward points so it only cost me $18
The hitch pin was $7
Neoprene washers $1.90
Grand total $73

I already had bolts, washers and paint. If you wanted to do this yourself you could just use a bolt or band peg and not use the landmine swivel and hitch pin.

It would cost you;
Tube steel $30-35ish
Plate holders $46 (you'll have 2 extra)
Flat black Rustolem spray paint $4
Bolts/washers $5-10
So a total of around $85-95


I tried to make an attachment like the jsquat. I haven't used an angle grinder in years and it got away from me a bit at the top. I think it's still enough metal. But I've noticed the carabiner slides side to side a bit, I didn't notice the jsquat attachment has a little bend. I may end up cutting it off and going with something else like an eye bolt or shackle.
*note for those who didn't already know. A 5/8 bolt will not fit in a hole made by a 5/8 drill bit, you need to go up a size.

I have a Rogue dip belt, the rings are quite high. I know the spud belt has long straps which makes it harder to hit depth.
I now know I can definitely use more of the chain, this was just a test to see if I can hit depth without needing boxes. With the chain set like this I struggled to get the plates to bottom out, got it on the 3rd, I don't think I would've if I had shoes on. I'm just a shade over 6 ft, the lever is 6 ft, the plate holders are 24 inches from the end, and the lever is attached to the upright at 23 inches.


I think that's all white lights.

I bought a foot of 2.5 x 2.5 tube, 72 inches of 2 x 3/16 flat bar, a 3/4 inch black iron nipple, and some bolts and washers for $34. I'm going to try to make a kickstand like the jsquat one. Might be a little while before you see video of that, the angles and getting the weight right will be a bitch.
That will bring my grand total to $107

I really hope this helps someone who's considering something similar
Last edited by Ragholmes on Mon Mar 04, 2019 6:36 am, edited 8 times in total.

User avatar
TimK
Much Mustache
Posts: 2979
Joined: Sun Sep 17, 2017 7:03 am
Location: Grand Rapids, MI
Age: 39

Re: The DIY Thread

#89

Post by TimK » Sun Mar 03, 2019 6:45 pm

@Ragholmes outstanding! Where did you get the tube steel?

Ragholmes
Registered User
Posts: 402
Joined: Fri Jun 22, 2018 2:20 pm

Re: The DIY Thread

#90

Post by Ragholmes » Sun Mar 03, 2019 7:44 pm

TimK wrote: Sun Mar 03, 2019 6:45 pm @Ragholmes outstanding! Where did you get the tube steel?
Thanks Tim, I'm really quite happy with myself right now.
From a not quite local steel supplier. I say not quite cause the closest to me had a $200 minimum order, so I had to drive a bit.
Sourcing the tube was the hardest part of this project.
Prices seem to be universally around the $30-35 mark. If you don't have a steel supplier close then you can buy it online, shipping is steep though. Try to find an online store closer to you to keep costs down.
I did the math and it was just a little cheaper to drive than the cheapest shipping from online.
20-30 bucks shipping hurts, especially when that's what the steel costs. But if that ends up being your best option it's still a pretty good low overall price for something like this. Especially when you consider a Rogue landmine is $95 plus shipping.

TimGarvey
Registered User
Posts: 50
Joined: Wed Mar 21, 2018 2:25 pm
Location: Utah
Age: 58

Re: The DIY Thread

#91

Post by TimGarvey » Mon Mar 04, 2019 12:52 pm

Excellent and cost effective design. Thanks for posting this. I'm going to start ordering parts. Based on your dimensions the felt weight is 66.6% of the loaded weight, with the weight loaded at 4 ft. from the fulcrum and your lifting point 6 ft. from the fulcrum. That is similar to the Edge Fitness standard belt squat where they list 70-75% felt weight. The 6 foot bar seems like a good compromise to allow you to store it as well. If you had the space, an 8 ft. bar and the weight 6 ft. from the fulcrum would give you 75% felt load. That is probably not a big consideration unless someone is very strong and maxing out their loading pins.

@Ragholmes I'm picturing you using standard plates on the 3/4" pipe to counterbalance the kickstand, is that right?

Ragholmes
Registered User
Posts: 402
Joined: Fri Jun 22, 2018 2:20 pm

Re: The DIY Thread

#92

Post by Ragholmes » Mon Mar 04, 2019 1:20 pm

TimGarvey wrote: Mon Mar 04, 2019 12:52 pm @Ragholmes I'm picturing you using standard plates on the 3/4" pipe to counterbalance the kickstand, is that right?
No, that's for the handle, 5/8 bolt just fits inside 3/4 pipe.
I've set up with the maintenance guy at work to do the cuts and drilling on thursday. So I should have it built by the weekend at the latest, and can show you then.
Not sure if I can explain the pictures that are only in my head right now but I'll try.
I have a foot of 2.5 x 2.5 tube and 72 inches of 3/16 flat steel. And I'm making a kind of sandwich I guess, flat steel then tube then flat steel.
The 'leg' will be around 15 inches. Trying to keep it light there will be a couple inches of tube for the foot and then a couple inches of tube about halfway up to give it strength. Then a bolt through both the stand and lever arm for the pivot. Then the there's the angle that I've still got to work out. Then from the pivot/angle I'll use as much tube as I can for weight before a small gap then the bolt and 3/4 pipe for a handle.
I'm gonna put some sort of small rubber bumper on the tube to soften the blow when it comes down on the other tube.
I hope that makes some sense, I really want to grab a pen and paper and draw it for you and hold it up the screen so you you can see it.
Right now I'm totally guessing that it might pivot by itself, but if it doesn't I will work out a way to cap the ends of the tube and fill it with something, maybe lead shot or ball bearings or something, I haven't really thought too much about that part and will cross that bridge if I need too.

Ragholmes
Registered User
Posts: 402
Joined: Fri Jun 22, 2018 2:20 pm

Re: The DIY Thread

#93

Post by Ragholmes » Mon Mar 04, 2019 1:46 pm

Double
Last edited by Ragholmes on Mon Mar 11, 2019 7:41 am, edited 1 time in total.

Ragholmes
Registered User
Posts: 402
Joined: Fri Jun 22, 2018 2:20 pm

Kickstand for Lever Belt Squat

#94

Post by Ragholmes » Sun Mar 10, 2019 2:21 pm

Finally got it done. And it works!
Plates on one side so you can see it.


The handle. Much happier with my angle grinding this time.


https://i.imgur.com/hwk2i4o.jpg

The top section.


https://i.imgur.com/yRxNtwv.jpg

The leg.


https://i.imgur.com/IvcYHvA.jpg

Pulled apart to paint, so here's an exploded view.


https://i.imgur.com/bBWHCsa.jpg

This took way longer than I hoped. I wasn't timing but the holes had to have taken 20-30 mins each. I had set up with the maintenance guy at work to use the drill press and saw on Thursday. But then he was off sick so I ended up doing this with an angle grinder, file and hand drill, so it took most of the weekend.
Triceps and wrists are toasted.
Last edited by Ragholmes on Sun Mar 10, 2019 7:29 pm, edited 1 time in total.

User avatar
damufunman
Registered User
Posts: 2974
Joined: Tue Sep 19, 2017 6:14 pm
Age: 36

Re: The DIY Thread

#95

Post by damufunman » Sun Mar 10, 2019 6:27 pm

Excellent work @Ragholmes!
I got my 8 holes cut on Saturday between cleaning up the garage and charging my drill battery while the baby napped. Kinda hoping my dril lcraps out, because other than having to drill a bunch of holes in metal (a rare occurance) it hasn't really held me up with anything. I should really just upgrade before I do Jerk Blocks, but I'm too stubborn and will inevitably spend several hours on a Saturday trying to do it with my POS Black and Decker 18v drill from college.
Just need to bolt stuff together, which likely won't happen until next weekend or the one after if I want to train this week.

gtl
Registered User
Posts: 1700
Joined: Fri Sep 15, 2017 10:04 am
Location: Naptown
Age: 38

Re: The DIY Thread

#96

Post by gtl » Mon Mar 11, 2019 3:36 am

I made 0 progress. I got my Spud belt squat belt in (the spud dip belt was entirely too uncomfortable with any kind of load on it).

I then couldn't hit depth with the way I wanted to set it up, not even with an 8inch box. I'm using
gtl wrote:
    Power rack w/ pin-pipe safeties
      CAP 086B bar
        Titan Fitness pin-pipe safety landmine pivot
          Chain collar
            Spud Inc dip belt squat belt

            User avatar
            TimK
            Much Mustache
            Posts: 2979
            Joined: Sun Sep 17, 2017 7:03 am
            Location: Grand Rapids, MI
            Age: 39

            Re: The DIY Thread

            #97

            Post by TimK » Mon Mar 11, 2019 7:02 am

            gtl wrote: Mon Mar 11, 2019 3:36 am I made 0 progress. I got my Spud belt squat belt in (the spud dip belt was entirely too uncomfortable with any kind of load on it).

            I then couldn't hit depth with the way I wanted to set it up, not even with an 8inch box. I'm using
            gtl wrote:
              Power rack w/ pin-pipe safeties
                CAP 086B bar
                  Titan Fitness pin-pipe safety landmine pivot
                    Chain collar
                      Spud Inc dip belt squat belt
                      What is the "chain collar" like? The one I used came with a chain but I couldn't use it, I had to just hook the rings of the belt right to the collar with one snap link.

                      Gibby
                      Registered User
                      Posts: 65
                      Joined: Mon Mar 26, 2018 12:34 am

                      Re: The DIY Thread

                      #98

                      Post by Gibby » Mon Mar 11, 2019 7:18 am

                      Any guides on how to build a platform? I'm pretty clueless but every home gym I see seems to have one. Is this easier than I'm imagining?

                      Is there any issue with just standing the rack on a couple sheets of plywood, then standing on a couple of smaller sheets cut to a square in front of the rack for DLing? (with some rubber weight lifting mats either side of that smaller plywood square)

                      gtl
                      Registered User
                      Posts: 1700
                      Joined: Fri Sep 15, 2017 10:04 am
                      Location: Naptown
                      Age: 38

                      Re: The DIY Thread

                      #99

                      Post by gtl » Mon Mar 11, 2019 7:21 am

                      TimK wrote: Mon Mar 11, 2019 7:02 am
                      gtl wrote: Mon Mar 11, 2019 3:36 am I made 0 progress. I got my Spud belt squat belt in (the spud dip belt was entirely too uncomfortable with any kind of load on it).

                      I then couldn't hit depth with the way I wanted to set it up, not even with an 8inch box. I'm using
                      gtl wrote:
                        Power rack w/ pin-pipe safeties
                          CAP 086B bar
                            Titan Fitness pin-pipe safety landmine pivot
                              Chain collar
                                Spud Inc dip belt squat belt
                                What is the "chain collar" like? The one I used came with a chain but I couldn't use it, I had to just hook the rings of the belt right to the collar with one snap link.

                                Image

                                Then just using a big carabiner to loop through that and the belt rings.

                                Jbroscious
                                Registered User
                                Posts: 22
                                Joined: Sun Dec 02, 2018 6:35 pm

                                Re: The DIY Thread

                                #100

                                Post by Jbroscious » Tue Mar 12, 2019 5:07 pm

                                Question for the DIY folks...

                                I made the mistake of looking at Rogue's website the other day and wandered into the sled section. Then I started really wanting a sled or prowler, because I hate running and it's cheaper than an exercise bike.

                                Then I started thinking...I wonder if I could make one? So here's my questions...

                                1. Has anyone here made a DIY sled or prowler? Thoughts? Plans you followed? Things I should know?

                                2. What are y'alls thoughts on these plans?
                                - https://soflete.com/blogs/knowledge/diy ... home-build
                                - https://www.artofmanliness.com/articles ... wler-sled/

                                Post Reply